 Save
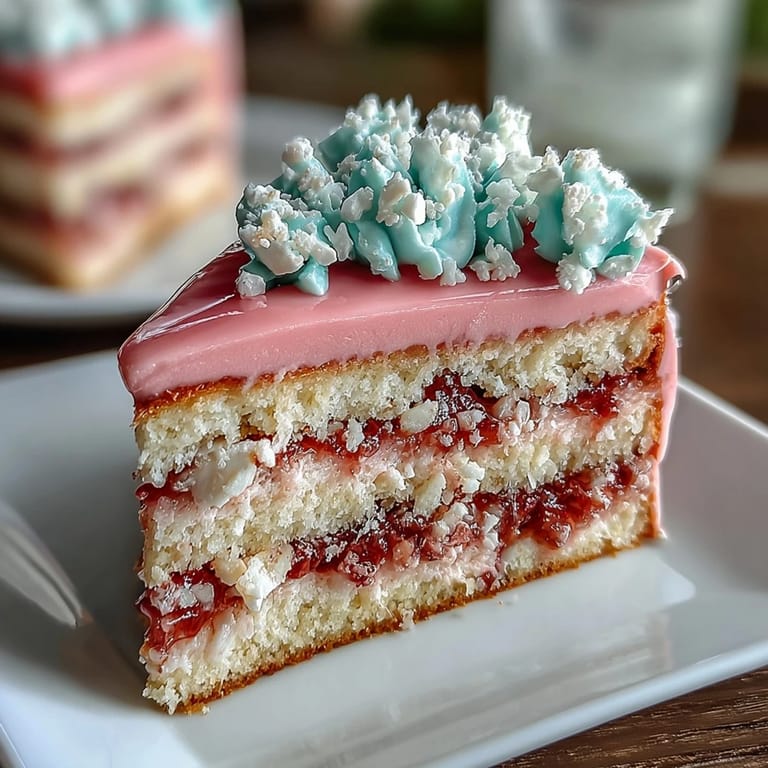
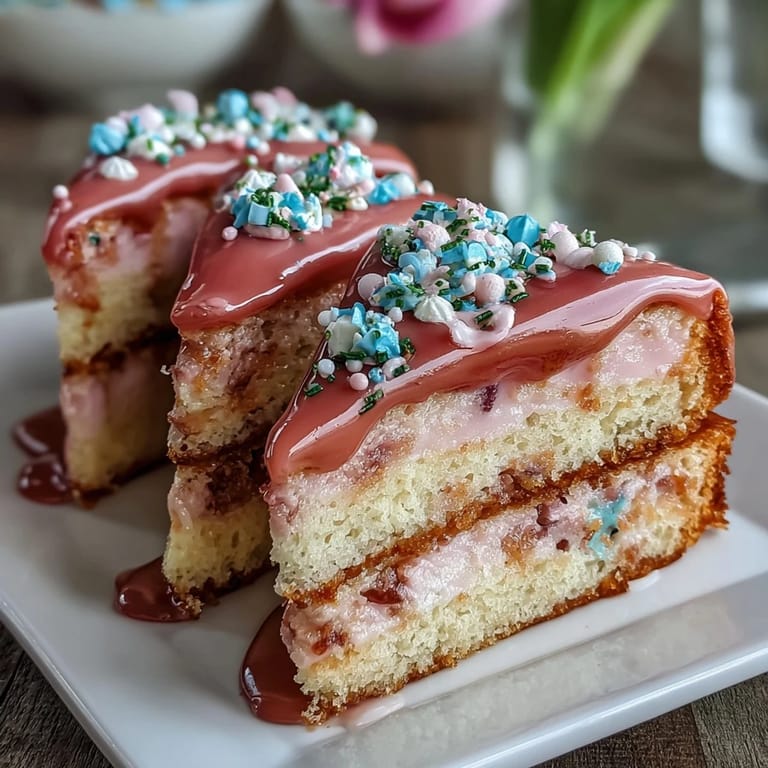
Save The moment I decided to bake this ombre cake, I was standing in my kitchen watching afternoon light paint stripes across the counter, and I thought: what if I could capture that exact feeling in dessert form? Spring had just arrived, and everything felt soft and new, so I started mixing pale pinks and buttery yellows into silky batter, layering them like a sunset no one expected indoors. What began as a quiet afternoon experiment turned into something that made everyone who saw it pause and smile before even tasting it.
I'll never forget bringing this cake to a spring baby shower where the mom-to-be had mentioned loving pastel colors but being tired of clichés. When I set it down on the table and she saw that gradient shifting from pale yellow to blushing pink, she actually teared up—not because it was perfect, but because someone had listened and turned that into something edible. That's when I realized this cake wasn't just about technique; it was about making people feel seen.
Ingredients
- All-purpose flour (3 cups): The foundation of a tender crumb, and measuring by weight keeps things consistent across batches.
- Baking powder (2 ½ teaspoons): This lifts the cake just enough to create that impossibly soft texture without making it cakey or dense.
- Unsalted butter (1 cup for batter, 1 ½ cups for frosting): Room temperature is non-negotiable here; cold butter won't cream properly and you'll lose the light, fluffy structure.
- Granulated sugar (2 cups): Beating it with butter creates tiny air pockets that become the cake's delicate crumb.
- Eggs (4 large, room temperature): Cold eggs won't emulsify smoothly; let them sit on the counter while you prep other ingredients.
- Pure vanilla extract (1 tablespoon plus 2 teaspoons): The real stuff matters here because it's subtle in a delicate cake like this.
- Whole milk (1 cup, room temperature): Alternating with dry ingredients prevents the batter from becoming tough or overmixed.
- Gel food coloring (pink and yellow): Gel is better than liquid because it won't thin your batter, and these soft pastel shades are the whole point.
- Powdered sugar (5 cups, sifted): Sifting removes lumps and ensures silky, lump-free frosting every time.
Tired of Takeout? 🥡
Get 10 meals you can make faster than delivery arrives. Seriously.
One email. No spam. Unsubscribe anytime.
Instructions
- Set up your mise en place:
- Preheat your oven to 350°F and grease three 8-inch pans with butter, then line them with parchment—this prevents sticking and makes removal effortless. Have all your ingredients measured and ready at room temperature before you start, because once you begin creaming the butter, things move quickly.
- Build your dry foundation:
- Whisk together the flour, baking powder, and salt in a medium bowl until fully combined; this distributes the leavening evenly so every layer rises with equal grace.
- Cream butter and sugar until clouds form:
- In a large bowl, beat the softened butter with sugar on medium speed for 3 to 4 minutes, scraping down the sides halfway through; you're looking for something pale, fluffy, and noticeably lighter in color than when you started.
- Incorporate eggs one at a time:
- Add each egg individually, beating well after each addition to ensure proper emulsification; this creates a stable batter that holds air and produces a tender crumb.
- Add vanilla and alternate wet and dry:
- Mix in the vanilla extract, then add the flour mixture and milk in three additions, starting and ending with flour, mixing just until the streaks of flour disappear—overmixing develops gluten and toughens the cake.
- Divide and tint your batters:
- Pour the batter equally into three bowls, then add a small pinch of pink gel coloring to one bowl and yellow to another, stirring gently until the color is even; leave the third plain for a neutral layer in the middle. The pale shades are what make this ombre work, so use restraint with the coloring.
- Bake with care and patience:
- Pour each colored batter into its prepared pan, smooth the tops, and bake for 22 to 26 minutes until a toothpick inserted in the center comes out clean or with just a crumb or two. The tops should spring back slightly when lightly touched.
- Cool gradually to avoid cracks:
- Let the cakes rest in their pans for 10 minutes to set, then turn them out onto wire racks and cool completely before frosting; warm cakes will melt the frosting and slide around.
- Make silky buttercream frosting:
- Beat softened butter on medium-high speed until it's pale and creamy, about 2 minutes, then gradually add the sifted powdered sugar, vanilla, salt, and 3 tablespoons of milk or cream, beating until fluffy and spreadable. Add more milk a teaspoon at a time if it seems too stiff, but remember that it thickens slightly as it sits.
- Color your frosting to match the cake:
- Divide the frosting into three bowls and tint them to match your cake layers—one pale pink, one pale yellow, and one plain—using the same restraint you used with the cake batters.
- Layer and build your ombre masterpiece:
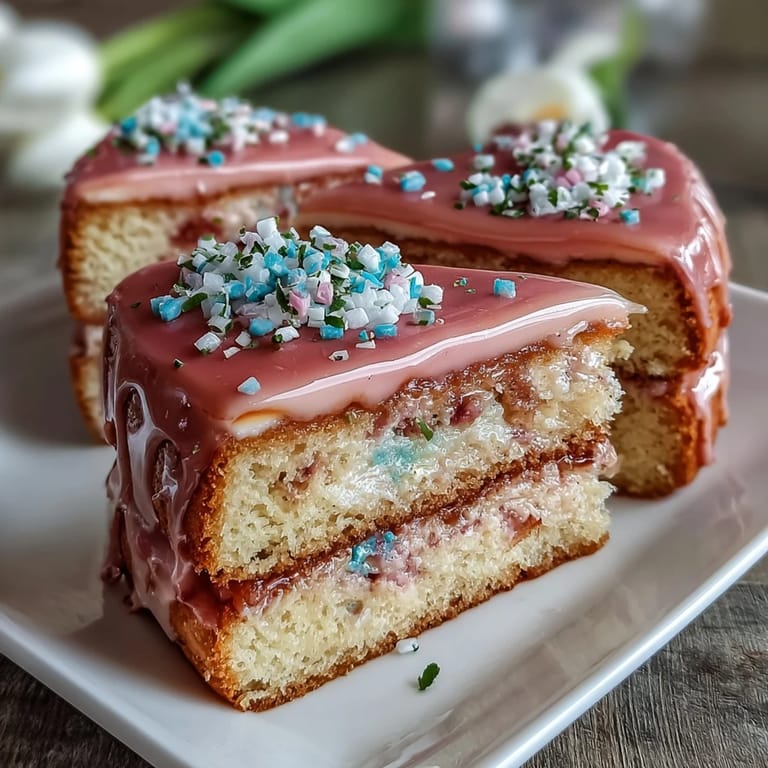
- Start with the yellow cake layer on your serving plate and spread it generously with yellow buttercream, then top with the plain or peach layer and spread with plain frosting, finally add the pink layer on top. If your cake layers have domed tops, use a serrated knife to level them for even stacking.
- Create the ombre gradient on the sides:
- Use an offset spatula to spread remaining frosting around the sides, starting with yellow at the base and blending up toward pink at the top; use a cake scraper or bench scraper to smooth and blend the colors into a soft gradient. The blending is what transforms this from pretty to absolutely stunning.
- Finish with elegance:
- Decorate the top and sides with pastel sprinkles, edible flowers, or whatever feels celebratory to you, then refrigerate for at least 30 minutes before slicing to ensure clean, neat cuts.
 Save
Save Months later, that same mom sent me a photo of her daughter's first birthday cake, and it was this same ombre design, now a tradition in their family. That's when I understood that recipes like this one aren't just instructions; they're invitations to create something that lingers in memory long after the last crumb is gone.
The Magic of Gel Coloring
I learned this the hard way after a batch where I grabbed liquid food coloring on autopilot and watched my batter thin out, turning into something that baked flat and heavy instead of fluffy. Now I keep gel coloring in my cabinet like a secret weapon, and the difference is instantly noticeable—the batter stays thick, the crumb stays tender, and the colors come out exactly as intended. It's one of those small decisions that feels trivial until it isn't.
Keeping Your Cake Level and Beautiful
A slightly domed cake layer might not seem like a big deal until you're trying to stack three of them and they keep tilting like the Leaning Tower of Pisa. I started using a serrated bread knife and a gentle sawing motion to level the tops, and it changed everything—now my assembled cakes stand straight and tall, and the frosting sits evenly on each layer. This simple step is the difference between a cake that's delicate and one that's structurally sound.
The Art of the Ombre Blend
Creating a smooth ombre gradient takes patience and a light touch, so don't rush the frosting stage or it'll look streaky instead of seamless. I use an offset spatula to apply each color to the sides in vertical sections, then switch to a cake scraper to gently blend where the colors meet, working slowly and letting the frosting do the work rather than forcing it. The result should look like colors melting into one another, not like you painted on stripes.
- Start with the lighter color at the bottom and work your way to the darker shade at the top for the most natural-looking gradient.
- Keep a warm, damp cloth nearby to clean your frosting tools between colors so you don't muddy the palette.
- Practice the blending motion on a plate first if you're nervous—this cake forgives small imperfections as long as the overall effect reads as intentional.
 Save
Save This cake reminds me that the most beautiful things in life often come from simple ingredients treated with intention and care. Whether you're baking it for a celebration or just because an ordinary Tuesday deserves something extraordinary, this ombre cake will deliver.
Recipe FAQs
- → How do I achieve the ombre effect?
Divide batter into three parts and tint each with pink, yellow, or leave plain. Layer them carefully during assembly for the gradient effect.
- → What is the best way to color the buttercream?
Use gel food coloring to avoid thinning the buttercream. Tint separate portions to match each sponge layer's shade.
- → How long should the layers cool before frosting?
Allow cakes to cool completely on wire racks, at least 30 minutes, to prevent frosting from melting.
- → Can I substitute ingredients for dietary needs?
Butter may be replaced with vegan margarine and milk with plant-based alternatives but may alter texture and taste slightly.
- → What tools are recommended for smooth frosting?
An offset spatula and cake scraper help achieve a clean and even buttercream finish along the sides and top.